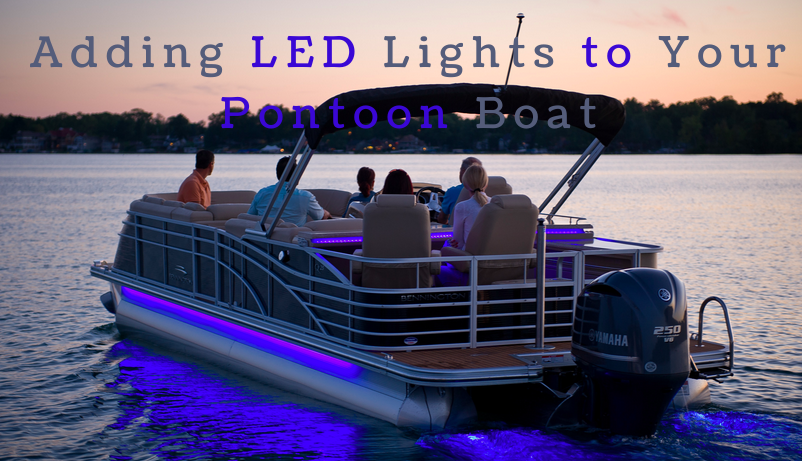
Pontoon boats are ideal for a sunset cruise or entertaining friends under the stars. With wide-open deck plans and plenty of comfortable seating, they are the perfect place to relax.
A nice feature on this Bennington pontoon is the LED lighting package. You will find many new pontoon boats with LED sidelights, deck lights, and underwater lights as standard or optional equipment.
These can be single color lights or RGB “color-changing” lights depending on the make and model. Low-end models come with no lighting or single-color LED lights. In contrast, high-end pontoon boats include single-color or color-changing LEDs.
Either way, LED lighting adds a serious “cool factor” to a pontoon boat that attracts plenty of attention at the marina and on your lakefront property.
Color-Changing Pontoon Boat Lights-
As mentioned above, high-end pontoon boats usually have better lighting packages. Frequently, these include RGB, (red, green, blue) LEDs and a light controller.
RGB LEDs are different than other lights. A group of three LEDs, one red, one green, and one blue work together to produce a rainbow of colors.
A light controller precisely controls the intensity of each LED to create different colors. Naturally, better light controllers give you more colors. But they also allow you to change the brightness of each color and even cycle through different colors.
Often, low-end pontoon boats and older boats have no LED lighting. But this is not a disadvantage. It’s an opportunity. With a small investment in time and money, these boats can have a lighting system as good as or even better than what comes from the factory.
In this post, I’ll show you how to install led strips on a pontoon boat as sidelights. In future posts, we’ll expand on this project to include accent lighting and underwater lights.

LED Pontoon Boat Sidelights-
As with factory lighting, you have two options for pontoon boat sidelights. Single color or color-changing.
Single color LED strip lights are cheap and easy to install. Mount them to the underside of the deck on each side of the boat then wire them to a switch.
What You Need-
- Waterproof LED Strip Lights: A silicone sleeve protects the LEDs from water while tinned wire prevents corrosion.
- Silicone Mounting Brackets: Inexpensive and easy to use. Place them over the light strips silicone sleeve of and fasten in place with two screws.
- Drill with Phillips Head Bit
- Switch: Single color lights use an ON/OFF switch.
- Extra wire, butt connectors, crimping tool, and heat shrink.
Wiring the Light Switch-
To begin with, you need a switch to power the lights. Oftentimes, boat manufacturers build boats with an extra switch. If this is the case with your boat, that switch can be used to power the lights.
Look for a power wire coming from the back of the switch. Oftentimes it is red, but it could be one of several other colors as well. Knowing the color of this wire will make it easier to find in the next step.
Wires are often bundled together at the switch panel and routed to a central location. Follow this bundle and look for unconnected wires the same color of the wires from the switch. Use a test light to verify that this is the wire from the switch.
In the event, your boat does not have an empty switch you will have to add one. The video below gives you the basics of how to do that.
Wiring LED Strip Lights-
First, turn off the power at the main battery switch and remove the negative cable from the house battery.
Next, run wires from the switch to each side of the boat. Use a multi-wire butt connector to split the single wire from the switch into two wires.
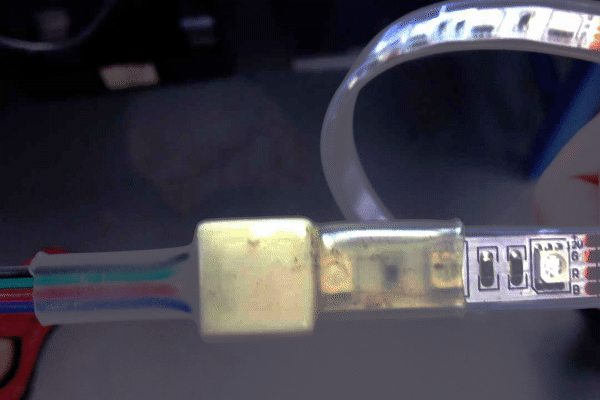
Crimp the small side of the butt connector to the wire from the switch. Crimp the wires from the lights to the other end of the butt connector. Use heat shrink to seal the connection.
Run one wire to each side of the boat. Use a butt connector to connect that wire to the power wire of each light. Again, crimp and heat shrink the connection.
Finally, connect the negative wires from the lights to the boat’s negative bus bar. Again butt connectors and heat shrink tubing connect the negative wire from the lights to the wire that runs to the bus bar. Crimp a ring connector to the end of the wire for a secure connection to the bus bar.
With all wires connected it is time to test the lights.
- Check for a fuse at the fuse block .
- Reconnect the negative cable to the battery.
- Set the main battery switch on.
Flip the switch to make sure the lights come on. If not, disconnect the power and check your connections.
Finally, you can mount the light strips to the underside of the deck using the silicone mounting brackets. The brackets fit over the light strips and are held in place using two screws. Don’t over tighten the screws as this can damage the bracket.
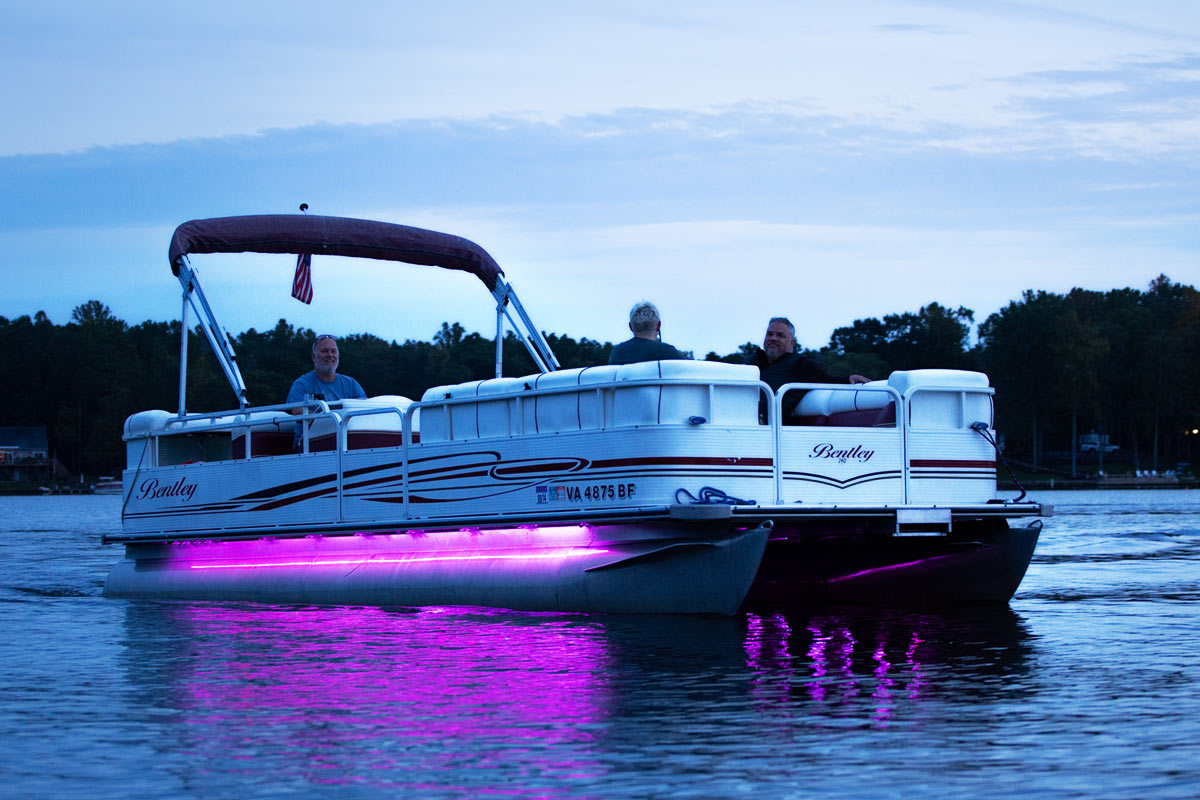
Color-Changing Pontoon Boat Sidelights-
Color-changing pontoon boat sidelights are more expensive and complicated to wire than single-color lights. But, if you want a truly awesome lighting system it is worth the expense and effort.
RGB light strips have four wires. Red, green, and blue wires supply power to the LEDs. Black is a common ground. Again, look for waterproof RGB light strips encased in a silicone sleeve with tinned wires.
A waterproof RGB light controller is a must. Look for one enclosed in a watertight box or sealed housing.
Several different types of LED RGB light controllers are available. To keep things simple I am only going to talk about a basic controller that uses an ON/OFF momentary switch to control the lights.
There are two parts to this system.
- RGB Light Controller: This is a watertight box that houses the electronics and acts as a hub for wires from the lights and the switch.
- ON/OFF/Momentary Switch: This switch has three positions. On, off, and momentary. An example of a momentary switch is a doorbell. Pressing the switch closes a circuit and sends an electrical signal. Releasing the switch opens the circuit and the signal stops.
Wiring RGB Light Strips-
The switch mounts at the helm. It draws power from a fuse block and grounds to a negative bus bar. Three wires, power, ground, and control, connect the light controller to the switch.
The RGB light controller has three snap-down terminals to accept the wires from the switch. These terminals are color-coded to make wiring easier. The controller has four, color-coded terminals for the wires from the lights as well. Red, green, and blue terminals for the power wires and black for the ground.
RGB strip lights have three power wires, red, green, and blue, along with a black ground wire. **Power wires from the lights must connect to the correct terminal. Red to red, green to green, and blue to blue. It is recommended you use red, green, and blue wires from the lights to the power box.
When all of the wires are connected, turn the power back on and test the lights.
Depending on your light controller, you should be able to change colors, dim the lights, and cycle them between different colors. Check your owner’s manual for how to operate your light controller.
Once everything is working properly the RGB light strips can be mounted to the underside of the deck.
Adding LED lights to your pontoon boat is a wonderful way to make your new lake home truly feel like fun!
Original Post by https://underwater-lightsusa.com/diy-pontoon-boat-sidelights/
Reposted by Scott Freerksen “The Lake Guy”